Sunday, October 16, 2011

Roasted Pumpkin Seeds!

Hello! Long time no see. I hope you all have had a great summer. I've been not too far from my kitchen. Here are a few goodies, I've baked up within the past few months.

Caramel Chocolate Shortbread


Blueberry muffins - three ways

And LOTS of sourdough bread. I've been devouring one of Peter Reinhart's books.

Now, after gutting and gouging our pumpkins, it's time for roasted pumpkin seeds. These seeds are impossible to mess up.

Sort the pumpkin seeds from the pumpkin guts. Wash the seeds a bit in a colander. Set the oven for 300 degrees F. Lightly grease a sheet pan. Spread the seeds out evenly and mist them with a bit of oil. Sprinkle generously with whatever seasonings you like. This year I chose salt, garlic powder, and dill. Salt, thyme, and rosemary is also nice, or any ol' pre-mixed seasoning will do. Salt, pepper, and vinegar might also be tasty. You could even make them spicy with cayenne and paprika. Toss to coat and put them in the oven for 10 minutes. Stir and spread evenly again. Bake for another 10 minutes. Check to see if they are light and crispy. If not, bake for another 5 minutes or so. They should be just very slightly browned. Keep in an airtight container for a few weeks.

Happy Halloween!

Monday, May 2, 2011

Karli's baby shower!

Hot Cookie Karli is so prego! Karli and Travis's first little one will be arriving in late August. To celebrate this momentous occasion, Handicrafter Aubrey of Backwoods Belle, and I threw a vibrant baby shower. Here's what was served and gobbled up:

Electric cupcakes! It's Martha's Devil's Food Cupcake with this no fail icing. I found that the icing needed more cream. I just kept adding - slowly - until I found the desired consistency and taste.

Aubrey rocked out the decorations. I'm sad that I didn't get a photo of her banner. :(

The Spread:

Caprese style marinated mozzarella and tomatoes adapted from this recipe. I used whole cherry tomatoes and a lot of chopped basil. Tossed all of the ingredients into a zip-top bag and let the flavors muddle for a day.

Turkey tea-sandwiches with a special cream cheese spread adapted from Ina Garten. I just combined 8oz. of cream cheese, 1/4 cup of fresh basil, 1/4 cup of caramelized onions, 1/4 cup of dried cranberries, and salt and pepper to taste - whipped together in a food processor and spread on artisan bread.

Chocolate covered strawberries and buttermilk biscuits with jam and honey butter. Be sure to use unsalted butter or cut the salt down by half for the biscuits. They were a touch too salty, but I heard no complaints.

Sea salt chocolate chip cookies from the chocolate genius, Jacques Torres.

And I pulled a super sweet mocktail out of the blue. It was a blueberry limenade made with 50 fl. oz. of sparkling, unsweetened blueberry juice (found at Trader Joe's), 1 cup of freshly squeezed lime juice, 1 cup of sugar (I used turbenado sugar), a handful of fresh mint, and a load of ice. This one got rave reviews.

The party was super fun to plan. Congrats, Karli and Travis!!!

Saturday, April 23, 2011

Carrot Cake for zee Easter bunneh

I totally meant to post this earlier, but whatever. Carrot cake isn't a seasonal thing, it's just nice to make it for such occasions like Easter. Easter bunnies dig carrot cake. This recipe comes from a random, great baker from AllRecipes.com. I will NEVER use another recipe. That's how flippin' good this one is. This recipe makes an excellent layer cake. I've done this in the past and got ooos and ahhhs. Make it with or without nuts; both ways are great.

A food processor makes the carrot shredding easy work, and the cake comes together in minutes. You'll need 3 cups of shredded carrots.

Eggs in oil. Odd looking, yet pretty.

Adding the dry ingredients to the wet.

Not the best looking batters. Not even the nicest looking cake, but the taste makes up for it. The icing hides any ugliness anyway.

The icing for this beast is awesome. Whip it until it's nice and fluffy.

Schmear it on. For a sheet cake, I cut out an entire cup of powdered sugar. If I'm making a layer cake, I'll definitely put the 4th cup in. Tastes great either way.

Happy Easter!

Sunday, April 10, 2011

Schnack bars!

Those snacky folks among us probably spend a nice wad of money on snack bars/granola bars. The truth is is that they're easy to make, they're customizable, they make a lot per batch, and are pretty darn tasty.

These bars are layered, but I think it might work to just stir all of the ingredients together, but don't quote me. The layers aren't that much trouble anyway. To begin, preheat your oven to 325 degrees and line a square, 8 inch baking pan with parchment paper or foil, extending the paper/foil over the pan edges. I suggest you do this and not just grease the pan like I did. I ended up with many broken bars.

First, combine 1/2 cup of flour, 1/2 cup of rolled oats, 1/4 cup of brown sugar, a pinch of salt, and (optional) 2 Tbsp of flax seeds. Pour 1/4 cup of melted butter into the flour/oat mixture and stir until combined. Divide this mixture in half. Spread half of the mix evenly on the bottom of the lined pan. Press down a bit; like you would a graham cracker pie crust.

For the center layer, combine 3/4 cup of sweetened condensed milk, 1 cup of (preferably unsweetened) flaked coconut, 1 cup of nut of choice (I used walnut), 1 cup of dried fruit of choice (I used cherry), and 3/4 cup of chocolate chips in a separate bowl. Stir well, and pour into the pan - on top of the first layer. Spread it out evenly.

Now pour the remaining oat/flour mixture on the top. Spreading that layer out evenly. Now give it a nice press to bind the layers together. Bake for 30 minutes or until lightly golden. Let it cool, then cut into bars or squares. You can package them individually with a little plastic wrap. Store them in the fridge, and take them on the go!


Sunday, March 27, 2011

Coolest Easter egg ever!

I stumbled upon a very cool how-to blog called not martha. Not martha has some very fun/creative tutorials. This one was about how to make hollow chocolate eggs inside of real egg shells. I would like to try to make these one day...not any time soon though because it seems quite labor intensive. This blog post was just too great not to share. Check it out here.

Thursday, March 17, 2011

Creme Brulee Party

Creme brulee is dessert of the gods and a recent obsession for me. I've had it here and there, but I didn't fully appreciate this decadent dish until I made it with some friends. I couldn't believe how simple it is. It takes just five ingredients and patience for the cooking and chilling time.

Let's do this thing.

It all starts with a half cup of sugar and some eggs: one whole egg and four egg yolks. Beat until just combined - no whipping.

Scald three cups of cream, and SLOWLY pour into the bowl with the sugary eggs while the mixer is on. Don't pour too fast or you'll have scrambled eggs in your creme brulee. That's just gross.

Flavor that creamy sauce with vanilla (1 tsp.) and booze (1 Tbsp.). An orange flavored liquor was suggested. Pour into six ramekins and place them in a sheet pan with a tall lip.

This, I'd say, is the most risky part. The oven is preheated to 300 degrees, and I'm pouring boiling water into the tray, making a water bath. Just be careful and get some assistance. If you're using small, deep cups, you'll need to bake them for at least an hour. Wide, shallow cups will cook more quickly.

You have the option of skimming the foam from the tops of custard, but it's going to be covered with sugar anyway. A little foam never hurt anyone. Now put them in the fridge to chill.

After they have chilled for at least a couple of hours, with a kitchen torch, you can slowly melt the sugar, rotating the flame around until the desired golden brown crust appears. If you don't have a torch, I suggest you get one because even if you only use it to make sugary crusts on top of creme brulee, it's worth it.

I used Ina Garten's recipe, and she's got a short clip from one of her shows illustrating how easy it is to make creme brulee. Oh, next time I make this, it's going to be chocolate flavored.

Sunday, March 13, 2011

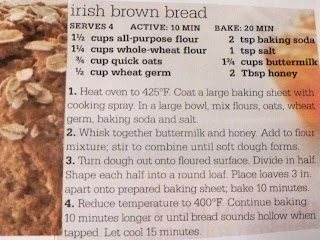
Irish Brown Bread

I love St. Patrick's Day. I don't even know if I have any Irish in my blood, but I still love the holiday. In America, we wear green and drink a lot of green beer, but actually in Ireland, it's a quiet, holy day. Either way, this bread is great for the occasion.

I think I love Ireland because of the culture, the landscape, and the cute, red-headed rascally boys that live there. I dig those red heads; that's why I nabbed one. He's not rascally, thank goodness. Now if only I could get him to speak with an Irish accent....

This quite a wholesome loaf that comes together in minutes. It's leavened with baking soda, so there's no resting and rising time.

Use a mixer (or a spoon) to get the ingredients together. Turn out the sticky blob onto a well floured surface. Gently knead it until it stays in a ball shape. Don't handle it too much or you'll get rock hard bread. Divide the dough in half and reshape into a ball.

You can add a bit of flair to the tops of the loaves by giving them a light coat of milk or egg and then sprinkling seeds or oats on top.

Bake them at 425 degrees for 10 minutes then lower the temperature to 400 degrees and continue baking for another 10 minutes. Check to see if they are done by tapping on the bottom and listening for a hollow sound. I like to check with a thermometer. When the internal temp reaches 185 degrees, then they're done. I had to bake mine for an additional 5 minutes.

If you didn't over knead, you'll have a light crumb. Look at all of those whole grains. Yay, happy colons.

Generously slather with butter, honey, peanut butter, almond butter, jam, cream cheese, etc. Try toasting it and topping with Greek yogurt and honey. So good!

Happy St. Patrick's Day and enjoy!

Sunday, March 6, 2011

Macaroni Madness

Like many college kids, when I moved out of my parents house, I had to figure out how to cook for myself. I loved this challenge, but in the beginning, I was calling to ask Mom and Dad lots of questions. This Chili Mac recipe was one that I made quite often. It's easy, quick, and satisfying. It's been probably seven years since I first made this dish on my own. I've made a few tasty adjustments since then. You can make this kid friendly by cutting out the spiciness. They'll eat it up like...well, like macaroni.

Spiffed Up Chili Mac

Ingredients:
- 1 lb. ground beef
- 1/2 cup of chopped onion
- 1 1/4 cups of elbow macaroni
- 1 15oz can of tomato sauce
- 1 15oz can of diced tomatoes (preferably with chipotle or diced chilies)
- water (save the tomato sauce can and fill it to the top with water)
- 4 to 5 large jalapeƱo-stuffed green olives, chopped (optional)
- 1 tsp chili powder
- dash of cayenne pepper (optional)
- 1 tsp salt
- shredded cheese (optional)

Directions:
In a large skillet, brown ground beef and sautee the onion on medium heat. Drain fat. Add all remaining ingredients except for the cheese. Stir until incorporated. Cover and simmer on medium-low heat for about 15 minutes, stirring occasionally. Serve immediately and top with cheese.

Saturday, February 26, 2011

BAGELS!

I've been craving carbs like mad lately, and bagels are at the top of my list. Bagels are something that I've always wanted to make. They are a cousin to soft pretzels and have the same degree of difficulty, which I'd say is moderate. As long as you follow the recipe instructions well, you're golden. I looked to fellow bagel-lover, Smitten Kitchen for this bagel run down.

It all starts with a "sponge" which is 1 tsp of instant yeast, 4 cups of bread flour, and 2.5 cups of room temperature water well blended and left to bubble for 2 hours. (PS - My notations are merely notations - a condensed version. Be sure to read Smitten Kitchen's very thorough instructions if you want to make these fantastic bagels.)

After the sponge has rested and is nice and bubbly, add to it 1/2 tsp of instant yeast, 3 cups of bread flour, 2.75 tsp. of salt, and 1 tbsp. of honey. Stir or mix until a ball forms. Turn out onto a floured surface and knead by hand for 10 minutes or for 6 minutes with a mixer. I've always gotten the best results when I use good ol' fashioned human elbow grease.

It should look a bit like this after the kneading process. Pliable and not sticky.

Now is the time to divide the dough ball into little balls. It's best to weigh your dough out equally so that they all cook evenly. My dough balls were weighed to 3 ounces each and they made an in-between standard and mini sized bagels. If you'd like the standard size, weigh your doughs to 4.5 ounces. I got 21 bagels from this recipe.

Cover the now mini dough balls with a damp towel and let them rest for 20 minutes.

After 20 minutes, it's time to make the bagel shape. There is more than one method to forming the bagels, but I like the method of poking a hole in the center of the dough ball and slowly squeezing/stretching into the bagel shape with your fingers.

On a baking sheet that has been lined with parchment paper and lightly greased, place the bagels at least 1 inch apart. Cover the pans with plastic wrap and tuck them into the fridge for the night. (Or let them chill for 4 hours.) The longer you let them sit, the more the flavors will develop. You can leave them in the fridge for up to 2 days.

When you are ready to bake your bagels, fill your widest pot with water, 1 tbsp of baking soda, and 2 tbsp of sugar or molasses - this will give your bagels a bit of color - and bring it to a boil. Line 2 baking sheets with parchment paper, spray them lightly with oil and sprinkle them with a bit of cornmeal. Working in batches, gently drop about 4 bagels in at a time. Boil for 2 minutes, flip over with a slotted spatula, and boil for another 2 minutes.

Place the bagels on a cooling rack with a sheet pan underneath to catch the hot water, toppings, and egg wash. There are a couple of ways to apply your toppings:

Before adding the toppings, beat an egg and coat the bagels with a light layer of the wash. You may then either sprinkle the toppings over the bagel or dip them in a shallow plate/container as pictured above. Toppings are optional. I'm a huge fan of flax seeds so I used flax meal, whole flax seeds, and poppy seeds for my bagels.

There's little need to worry about expansion during this baking process. I snuggled about 11 bagels on my sheet pans.

Bake them in an oven preheated to 500 degrees. Set the two racks in the center. You can bake both sheet pans at the same time or individually. I choose to bake them together, baking them for about 7 minutes then rotating each pan 180 degrees and switching the top pan for the bottom pan and baking for another 7 minutes - lowering the temperature to 450 degrees after the rotation.

You can bake them longer if they aren't brown enough. Mine turned out just perfect!

The texture is great! Nice and chewy. If you like a tougher exterior, I'd suggest baking them for a minute or two longer. I can't believe how nicely they turned out for my first bagel-making attempt. I know you can get a bagel for under $3, but it's TOTALLY worth it to make them on your own. Trust me.