Monday, April 22, 2013

Biscuit Making Video Tutorial


Greetings!  It's been a long time!  I've been wanting to show Karli my biscuit-making method for a while, but we live 160 miles away now.  The internet is such a glorious solution, so I made a video so she can see.  Here's a link to my tutorial on how to make light and tender biscuits.  The recipe and detailed instructions are below.   Enjoy! :)

Here's what you need:
• 4 ½ cups of flour -- plus more for dusting
• 1 tsp. baking soda
• 5 tsp. baking powder
• 1 tsp. salt
• 1 Tbsp. sugar
• 1 cup of cold lard, butter, or a combination of both*
• 2 ½ cups cold buttermilk**
• Melted butter (optional)

First measure your buttermilk** in a liquid measuring cup and put it in the freezer.  Keep the ingredients as cold as you can without freezing them.
Next in a big mixing bowl combine the flour, baking soda, baking powder, salt, and sugar.  Stir to combine.
Add the lard and/or butter*.  Cut it into the flour mixture until the lard/butter is in pea sized chunks.
Now pour the very cold buttermilk into the bowl.  Stir to combine, but do not over stir.  If the mixture is still very wet, add a handful of flour and mix.  The mixture should have some structure, but still be very wet.
Preheat your oven to 425 degrees.  Lightly grease 2 or 3 baking sheets or use parchment paper.
Generously flour your work space.  Pour out the biscuit batter/dough.  Sprinkle more flour on top and flatten down the pile.
Using the dough scraper, fold the dough upon itself.  Scrape the dough from the counter and scoot more flour under the dough if possible.  Keep moving the dough so that it doesn't stick much to the counter.  Fold about 5 to 10 times until the dough no longer spreads or falls apart, but stays sturdy yet soft.
Roll dough out to about ½ to ¾ of an inch.  The thinner your dough, the shorter your biscuits.  It's better too thick than too thin.  Cut with biscuit or cookie cutter.
Place biscuits on baking sheets about 1 to 2 inches apart.  I can fit 12 on one of my sheets.
If you want your biscuits to have a bit more color and taste, brush the tops with melted butter before you put them in the oven.
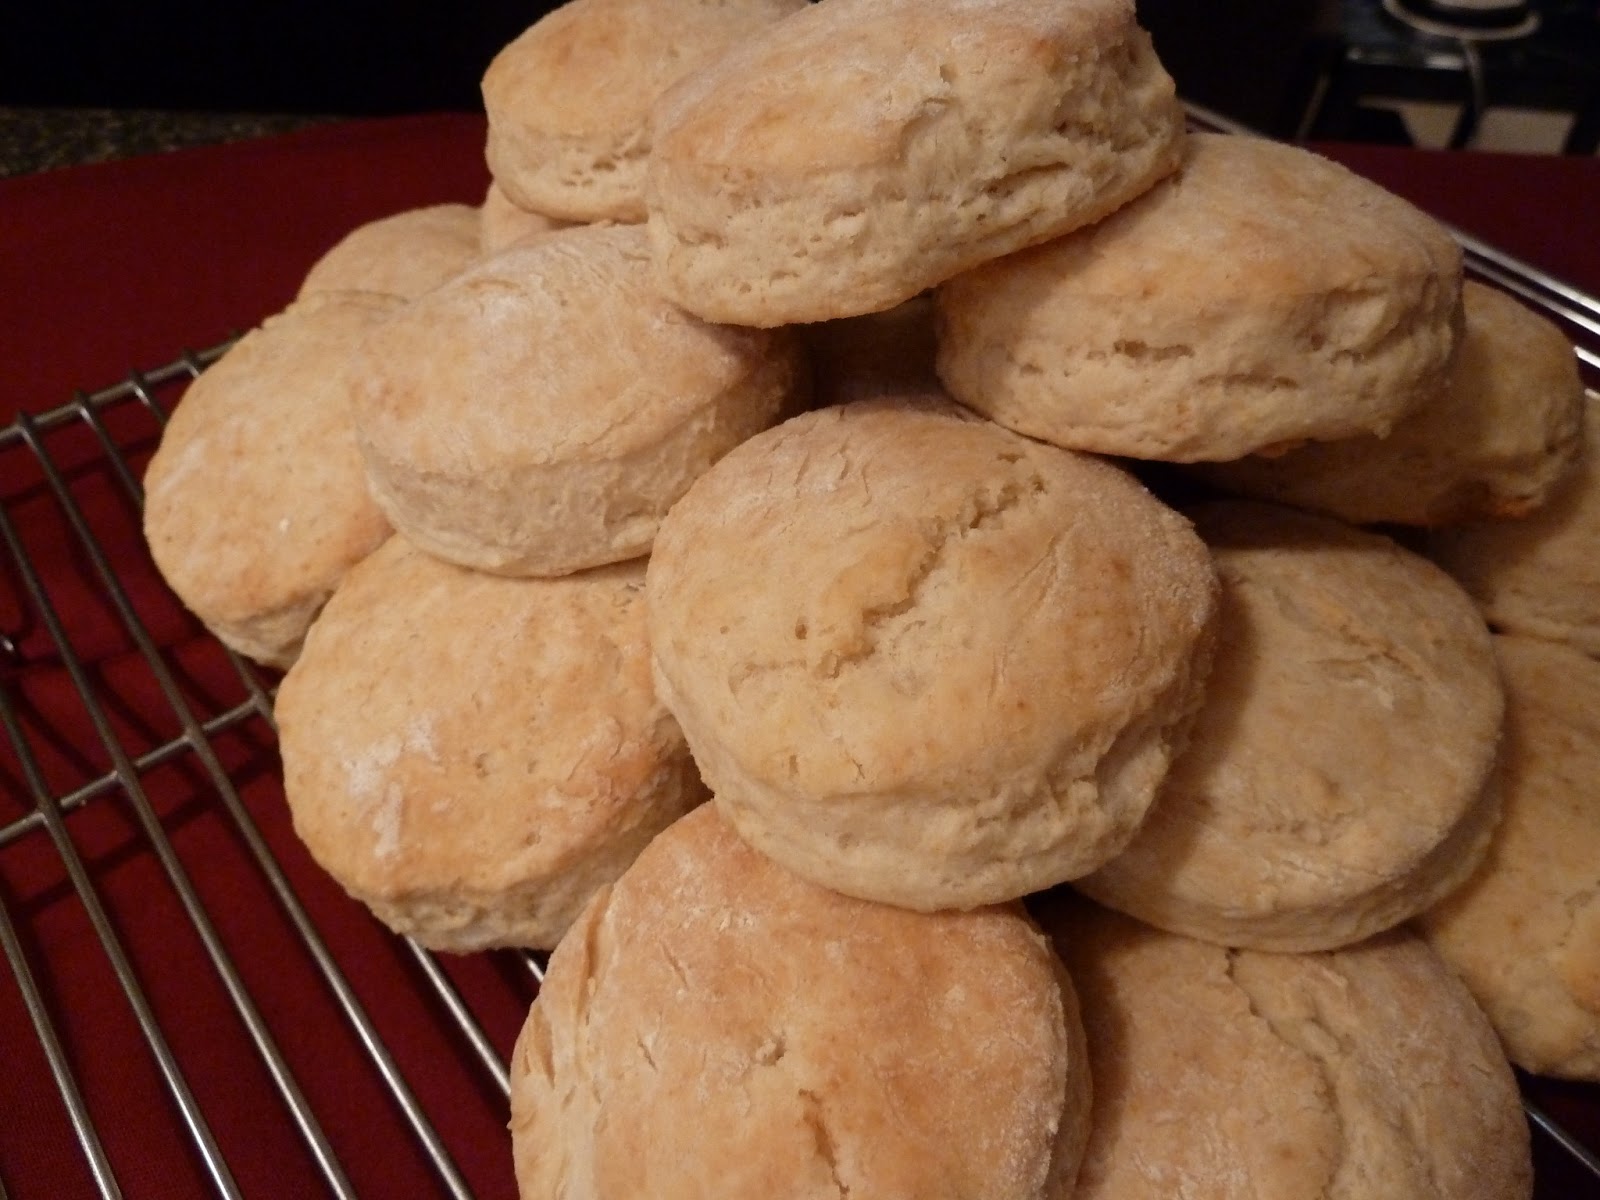
Bake for 20 minutes or until just slightly brown.  Let them cool on a cooling rack.
Makes 24 to 32 biscuits.  They keep for about a week and freeze well.

*I used ¾ cup of lard to ¼ cup butter.  DO NOT JUDGE THE LARD.  It has a bad reputation while bacon remains king.  Bacon=good.  Lard=good.  The lard I used in this video isn't ideal for biscuits.  I got it from the farmer's market and it's not as solid as commercial lard which is much harder.  Good lard is at least as hard as refrigerated butter.  You could also use shortening, but that stuff is the worst for you.  It's very important that the fat you use is very cold.  If not, the flour will start to absorb it and your biscuits won't be as tall and fluffy.  Cutting the lard or butter into cubes first with a knife will make it easier for you to cut them into the flour with the pastry cutter.

**If you don't have buttermilk, you can use milk soured with vinegar.  Put 2 Tbsp. vinegar in your measuring cup then fill the rest of the way up to the 2 ½ cup line with milk.  Let it sit for at least 5 minutes and then put in the freezer until your other ingredients are put together.  If you have yogurt, you can dilute it to buttermilk consistency with a bit of milk or water.

I found this recipe here.  The honey-butter sauce is nice, but not necessary.  My instructions are very verbose, but hopefully helpful.

Friday, July 27, 2012

Hilarious Contents of My '97 Time Capsule

So here are the obscure items that my 12 year old self thought would be of interest to the people of the future.  I never expected to see this time capsule ever again.  I thought that someone would find it decades, maybe even 100 years later and then learn what a child of the end of the 20th century was like.  Ha!  
My time capsule was made from an old Jiff peanut butter jar.
The introductory note to the future discoverer was folded like this and read:
 
I hid the time capsule in the basement/cellar of my old house, behind the stairs.  I knew that hiding space wasn't the greatest, but I didn't have time to dig a hole.  Surprisingly the capsule remained hidden for almost eight years.  Mary and David, the new owners of that house, went along with my instructions and wrote their name and the date on the "I have seen Sarah's Time Capsul" page.  Their kids reopened it just a few days ago and signed below their parents.  Mary was so awesome to give it back to me.
Ah, the old folded fortune teller.  I included one with just girls names and the other with just boys.  They were names of my classmates, of course. 
Scratch paper, a Hacky Sack, a flashcard of Spanish colors I used in 3rd grade, How to Draw a dragon instructions taken from the comics section of the newspaper, and homemade Stick Sticklys.
Some pins from the 1996 Atlanta Olympics, a spring, a tiny pencil from Lowe's, a pipe-cleaner-chicken in an mini Easter egg, a pencil topper, a Creepy Crawler, a Push-A-Point colored pencil, an IBC root beer bottle cap, a bookmark, a bracelet that I made, a mini maze puzzle, an unused box of crayons from Hard Rock Cafe, and what I thought was a test tube, but now know is a shot glass. 
These incredibly significant photos.  Read full story here
A tiny notebook and the other random photos I included: a chameleon, my cat Max, and a group photo taken on an Art Club field trip to Chicago in '97. 
 Inside the tiny notebook, I had a list of friends, names of my family members, list of my favorite numbers, an inventory list of the contents of the capsule, and what is shown here.  To the side is a list of "Popular Music Groups".  
 On the last page of the notebook, I wrote "My cat 'Punkin' died three years ago and is living on this property."  I think this is a clue as to where I buried the first time capsule I made.  I used a tin Folger's Cofee can and buried it within two feet of my cat.
No time capsule would be complete without an homage to The Beatles.  I wrote up that little summary myself.  This is an example of my first computer skills.  Lol.

Well, I'm  very glad that I had the foresight to do this as a kid.  Although the capsule didn't end up in a museum, it has sure made my day. 

Real Life, Freaky-deaky Twilight Zone Moment

Greetings!  I've recently experienced perhaps the most bizarre coincidence/synchronicity/serendipitous event of my life.  It was too good not to share so here it goes:

First, a pertinent update for those who might not know.  Since March of this year, I've been working at Conner Prairie, a living history museum.  My job at Conner Prairie is to play the role of a citizen of Prairie Town, a historically based town set in 1836.  My favorite role to play is the potter.  The ceramic skills I acquired from college helped me land this ridiculously fun job.  Here's me working in costume in the pottery shop.


And now a flash back:
When I was 12 years old, my family and I moved out of the house that I'd grown up in.  Before leaving, I made a time capsule.  I filled an empty peanut butter jar full of things I thought might be of interest in 100+ years when the capsule might be found.  This included an introductory note, five photos, and a smattering of other items.  

Well, the family who moved into that house eventually found the time capsule and returned it to me recently on July 25th, 2012.  Upon opening the capsule, I found the note.  It was dated July 29th, 1997 - almost 15 years ago to the DAY.  

Digging further inside the jar, I found the photos.  Three were of no great significance: a photo of my cat, a chameleon in a tree, and a group photo taken so far away that my classmates faces are indistinguishable.  And then I saw the fourth photo:


In this photo, my friends and I are on a field trip.....at Conner Prairie.  We're sitting on the porch of the Golden Eagle Inn.  This had to be in the fall of 1994 or spring of 1995.  We were in fourth grade.

Que the Twilight Zone theme now.  Here's the 5th photo.


It's me making pottery.  I still get chills when I see these photos.  My Dad is a photographer.  Out of the THOUSANDS of photos I could have put inside this time capsule, I put in these.  I was so excited that the next day at work, I showed many of my co-workers.  One of them, Shelia, took my photo on the same spot - the porch on the Golden Eagle Inn - to complete the circle.


I hope you've enjoyed this real-life Twilight Zone episode as much as I have.  I'll be posting about the hilarious contents of the time capsule here.  Thanks for reading!  

-Sarah


Sunday, October 16, 2011

Roasted Pumpkin Seeds!

Hello! Long time no see. I hope you all have had a great summer. I've been not too far from my kitchen. Here are a few goodies, I've baked up within the past few months.

Caramel Chocolate Shortbread


Blueberry muffins - three ways

And LOTS of sourdough bread. I've been devouring one of Peter Reinhart's books.

Now, after gutting and gouging our pumpkins, it's time for roasted pumpkin seeds. These seeds are impossible to mess up.

Sort the pumpkin seeds from the pumpkin guts. Wash the seeds a bit in a colander. Set the oven for 300 degrees F. Lightly grease a sheet pan. Spread the seeds out evenly and mist them with a bit of oil. Sprinkle generously with whatever seasonings you like. This year I chose salt, garlic powder, and dill. Salt, thyme, and rosemary is also nice, or any ol' pre-mixed seasoning will do. Salt, pepper, and vinegar might also be tasty. You could even make them spicy with cayenne and paprika. Toss to coat and put them in the oven for 10 minutes. Stir and spread evenly again. Bake for another 10 minutes. Check to see if they are light and crispy. If not, bake for another 5 minutes or so. They should be just very slightly browned. Keep in an airtight container for a few weeks.

Happy Halloween!

Monday, May 2, 2011

Karli's baby shower!

Hot Cookie Karli is so prego! Karli and Travis's first little one will be arriving in late August. To celebrate this momentous occasion, Handicrafter Aubrey of Backwoods Belle, and I threw a vibrant baby shower. Here's what was served and gobbled up:

Electric cupcakes! It's Martha's Devil's Food Cupcake with this no fail icing. I found that the icing needed more cream. I just kept adding - slowly - until I found the desired consistency and taste.

Aubrey rocked out the decorations. I'm sad that I didn't get a photo of her banner. :(

The Spread:

Caprese style marinated mozzarella and tomatoes adapted from this recipe. I used whole cherry tomatoes and a lot of chopped basil. Tossed all of the ingredients into a zip-top bag and let the flavors muddle for a day.

Turkey tea-sandwiches with a special cream cheese spread adapted from Ina Garten. I just combined 8oz. of cream cheese, 1/4 cup of fresh basil, 1/4 cup of caramelized onions, 1/4 cup of dried cranberries, and salt and pepper to taste - whipped together in a food processor and spread on artisan bread.

Chocolate covered strawberries and buttermilk biscuits with jam and honey butter. Be sure to use unsalted butter or cut the salt down by half for the biscuits. They were a touch too salty, but I heard no complaints.

Sea salt chocolate chip cookies from the chocolate genius, Jacques Torres.

And I pulled a super sweet mocktail out of the blue. It was a blueberry limenade made with 50 fl. oz. of sparkling, unsweetened blueberry juice (found at Trader Joe's), 1 cup of freshly squeezed lime juice, 1 cup of sugar (I used turbenado sugar), a handful of fresh mint, and a load of ice. This one got rave reviews.

The party was super fun to plan. Congrats, Karli and Travis!!!

Saturday, April 23, 2011

Carrot Cake for zee Easter bunneh

I totally meant to post this earlier, but whatever. Carrot cake isn't a seasonal thing, it's just nice to make it for such occasions like Easter. Easter bunnies dig carrot cake. This recipe comes from a random, great baker from AllRecipes.com. I will NEVER use another recipe. That's how flippin' good this one is. This recipe makes an excellent layer cake. I've done this in the past and got ooos and ahhhs. Make it with or without nuts; both ways are great.

A food processor makes the carrot shredding easy work, and the cake comes together in minutes. You'll need 3 cups of shredded carrots.

Eggs in oil. Odd looking, yet pretty.

Adding the dry ingredients to the wet.

Not the best looking batters. Not even the nicest looking cake, but the taste makes up for it. The icing hides any ugliness anyway.

The icing for this beast is awesome. Whip it until it's nice and fluffy.

Schmear it on. For a sheet cake, I cut out an entire cup of powdered sugar. If I'm making a layer cake, I'll definitely put the 4th cup in. Tastes great either way.

Happy Easter!

Sunday, April 10, 2011

Schnack bars!

Those snacky folks among us probably spend a nice wad of money on snack bars/granola bars. The truth is is that they're easy to make, they're customizable, they make a lot per batch, and are pretty darn tasty.

These bars are layered, but I think it might work to just stir all of the ingredients together, but don't quote me. The layers aren't that much trouble anyway. To begin, preheat your oven to 325 degrees and line a square, 8 inch baking pan with parchment paper or foil, extending the paper/foil over the pan edges. I suggest you do this and not just grease the pan like I did. I ended up with many broken bars.

First, combine 1/2 cup of flour, 1/2 cup of rolled oats, 1/4 cup of brown sugar, a pinch of salt, and (optional) 2 Tbsp of flax seeds. Pour 1/4 cup of melted butter into the flour/oat mixture and stir until combined. Divide this mixture in half. Spread half of the mix evenly on the bottom of the lined pan. Press down a bit; like you would a graham cracker pie crust.

For the center layer, combine 3/4 cup of sweetened condensed milk, 1 cup of (preferably unsweetened) flaked coconut, 1 cup of nut of choice (I used walnut), 1 cup of dried fruit of choice (I used cherry), and 3/4 cup of chocolate chips in a separate bowl. Stir well, and pour into the pan - on top of the first layer. Spread it out evenly.

Now pour the remaining oat/flour mixture on the top. Spreading that layer out evenly. Now give it a nice press to bind the layers together. Bake for 30 minutes or until lightly golden. Let it cool, then cut into bars or squares. You can package them individually with a little plastic wrap. Store them in the fridge, and take them on the go!