Saturday, February 26, 2011

BAGELS!

I've been craving carbs like mad lately, and bagels are at the top of my list. Bagels are something that I've always wanted to make. They are a cousin to soft pretzels and have the same degree of difficulty, which I'd say is moderate. As long as you follow the recipe instructions well, you're golden. I looked to fellow bagel-lover, Smitten Kitchen for this bagel run down.

It all starts with a "sponge" which is 1 tsp of instant yeast, 4 cups of bread flour, and 2.5 cups of room temperature water well blended and left to bubble for 2 hours. (PS - My notations are merely notations - a condensed version. Be sure to read Smitten Kitchen's very thorough instructions if you want to make these fantastic bagels.)

After the sponge has rested and is nice and bubbly, add to it 1/2 tsp of instant yeast, 3 cups of bread flour, 2.75 tsp. of salt, and 1 tbsp. of honey. Stir or mix until a ball forms. Turn out onto a floured surface and knead by hand for 10 minutes or for 6 minutes with a mixer. I've always gotten the best results when I use good ol' fashioned human elbow grease.

It should look a bit like this after the kneading process. Pliable and not sticky.

Now is the time to divide the dough ball into little balls. It's best to weigh your dough out equally so that they all cook evenly. My dough balls were weighed to 3 ounces each and they made an in-between standard and mini sized bagels. If you'd like the standard size, weigh your doughs to 4.5 ounces. I got 21 bagels from this recipe.

Cover the now mini dough balls with a damp towel and let them rest for 20 minutes.

After 20 minutes, it's time to make the bagel shape. There is more than one method to forming the bagels, but I like the method of poking a hole in the center of the dough ball and slowly squeezing/stretching into the bagel shape with your fingers.

On a baking sheet that has been lined with parchment paper and lightly greased, place the bagels at least 1 inch apart. Cover the pans with plastic wrap and tuck them into the fridge for the night. (Or let them chill for 4 hours.) The longer you let them sit, the more the flavors will develop. You can leave them in the fridge for up to 2 days.

When you are ready to bake your bagels, fill your widest pot with water, 1 tbsp of baking soda, and 2 tbsp of sugar or molasses - this will give your bagels a bit of color - and bring it to a boil. Line 2 baking sheets with parchment paper, spray them lightly with oil and sprinkle them with a bit of cornmeal. Working in batches, gently drop about 4 bagels in at a time. Boil for 2 minutes, flip over with a slotted spatula, and boil for another 2 minutes.

Place the bagels on a cooling rack with a sheet pan underneath to catch the hot water, toppings, and egg wash. There are a couple of ways to apply your toppings:

Before adding the toppings, beat an egg and coat the bagels with a light layer of the wash. You may then either sprinkle the toppings over the bagel or dip them in a shallow plate/container as pictured above. Toppings are optional. I'm a huge fan of flax seeds so I used flax meal, whole flax seeds, and poppy seeds for my bagels.

There's little need to worry about expansion during this baking process. I snuggled about 11 bagels on my sheet pans.

Bake them in an oven preheated to 500 degrees. Set the two racks in the center. You can bake both sheet pans at the same time or individually. I choose to bake them together, baking them for about 7 minutes then rotating each pan 180 degrees and switching the top pan for the bottom pan and baking for another 7 minutes - lowering the temperature to 450 degrees after the rotation.

You can bake them longer if they aren't brown enough. Mine turned out just perfect!

The texture is great! Nice and chewy. If you like a tougher exterior, I'd suggest baking them for a minute or two longer. I can't believe how nicely they turned out for my first bagel-making attempt. I know you can get a bagel for under $3, but it's TOTALLY worth it to make them on your own. Trust me.

Sunday, February 6, 2011

POM Muffins!

In December, POM Wonderful contacted us about using their 100% pomegranate juice in one of our baking experiments. Excited, I immediately rose to the challenge! It took me awhile to even decide what to make, but I rested on the idea of infusing breakfast muffins with POM. This recipe has been fiancée, friend, and co-worker approved. Here's how you make them:

In a medium bowl (or measuring cup), combine 1 cup of milk, 1/2 cup of POM juice, 1 beaten egg, 3 tablespoons of melted butter, 1 teaspoon of vanilla extract, and 1 cup of sugar.

In a large bowl, combine 3 cups of flour, 2 teaspoons of baking powder, and 1/2 teaspoon of salt. Mix well and then toss in 1 and 1/4 cups of frozen berries. I chose a blueberry, raspberry, and blackberry mix. Toss the berries in the flour. This will help the berries from sinking to the bottom of the muffin batter.

Pour the liquid mixture into the flour mixture. Be careful to not over stir the mix. It's OK if there's a bit of flour that isn't mixed in. It will bake just fine, and the muffins will be nice and tender.

Coat your muffin pans very well with butter. I've found that butter works better than spray oil. Pour the batter into each hole up to the top. This sounds like too much batter, but it works well.
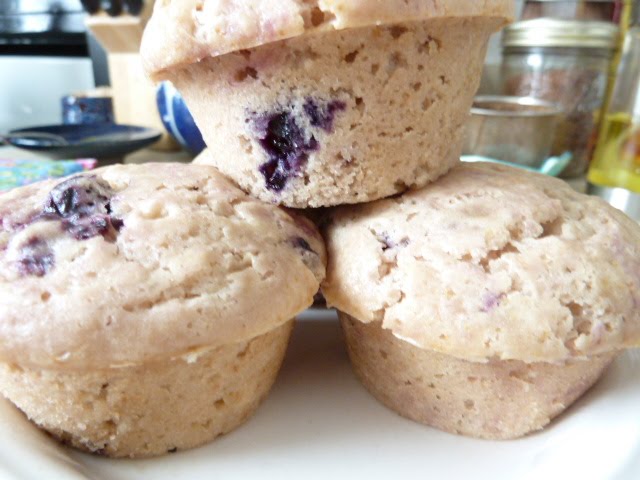
Perfect muffin tops! Baked in a preheated oven to 350 degrees for about a half hour.

These muffins are perfect for breakfast. They are fruity, tender, dense, and filling. This recipe makes about 12 to 14 muffins. Bake and share some with the ones you love.
Thanks for the juice, POM!

Friday, January 28, 2011

Paprika Chicken and Cornbread Muffins

Instead of going out for our anniversary this year, we decided to cook a meal at home. I found a paprika-rubbed chicken from Martha Stewart magazine. (Oh, Martha, I love-hate you.) The recipe calls for 8 heads of garlic to be roasted on the same pan with the chicken. While my fiancée is still a vampire, we skipped the garlic all together.

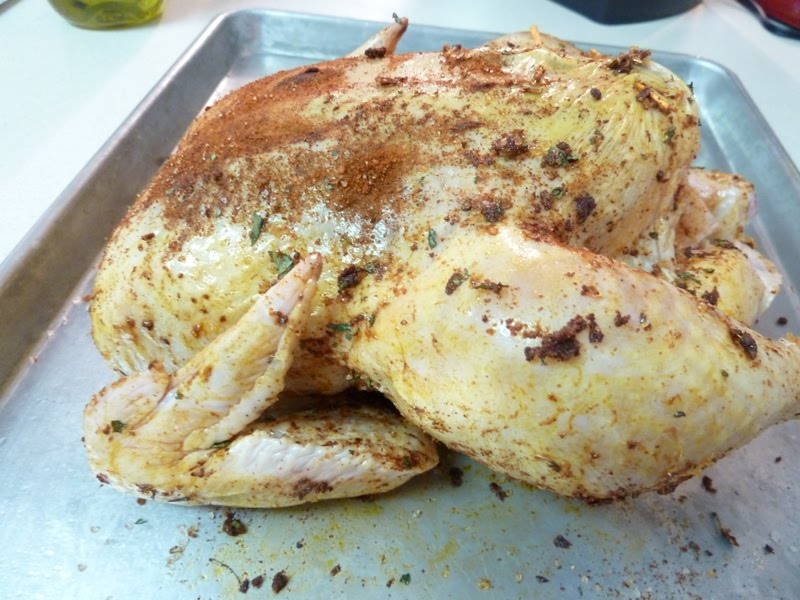
The chicken was fantastic on it's own. The skin was nice and crispy. The only thing I would change is to rub the paprika, oregano, and salt under the skin and add a little black pepper to the mix.

It was so tender and juicy. Be sure to cover the bird with foil and let it rest for at at least 10 minutes after removing it from the oven so that the juices can climb back into the bird. Get the recipe here. I would love to try the recipe completely, garlic and all. The garlic would round it out nicely.

As we were cooking a full meal: a roasted whole chicken, mashed potatoes & gravy, a fresh salad, and cornbread, we cut a few corners with a boxed cornbread mix. I don't see any harm in grabbing a box once in a while, especially when you can spice it up.

This cornbread box twist comes from a random old lady that I encountered in the baking isle at the grocery store once years ago. As I was grabbing a box of cornbread mix, she told me that to make the mix even better to add a 1/2 cup of self rising flour (or 1/2 cup of all-purpose flour, 1/4 tsp of salt, and 3/4 tsp of baking powder if you don't have self rising flour), an extra egg, and 1/3 cup of honey.

I found this method to make 10 regular sized muffins. For me, it cooked in the same amount of time as the box suggested - no difference at all. The after photo doesn't exist due to the complete inhalation of the cornbread muffins.

Enjoy your weekend! Happy cooking and baking!


Sunday, January 16, 2011

Soup for the winter blues

Hello again. I hope you haven't forgotten about this humble blog. I've been taking some time off to fight off the winter blues. That blasted winter gets me every year. I find myself loading up on vitamins (B complex, C, D, and 5HTP if you were wondering) and pining for sunshine. Behind the scenes, I've been working on a recipe using POM Wonderful's delicious pomegranate juice and a savory cocoa bread for ReadyMade Magazine. I hope POM and ReadyMade will like what I have in store. For today, I've got a roasted veggie stew that will warm the cockles of your soul.

First I have to show you my new knife. My pal, Natalie, brought it back from her stay in Japan. It cuts so extremely well. I was amazed at how I barely had to use muscle to slice through a potato. If you're interested in knowing how this knife and other sharp iron objects are handmade, check out the two blog posts that Natalie wrote on the subject. Part 1 and part 2. It's really interesting and makes you appreciate the hard work that is put into such a "simple" object.

On to the soup. Can I tell you how utterly in love I am with fennel bulb? I may never use celery again. For this soup, I chopped up one fennel bulb, 3-4 medium sized red potatoes, half of an onion, and about a cup of carrots. What's great about soup-making is that you can use whatever veggies you have on hand.

I chopped them to about the same thickness and drizzled & tossed them with a hearty pinch of sea salt and olive oil. Roast them in a 450 degree oven for 15 minutes, toss/turn then put them back in for another 15 minutes. Let them cook until they are a bit brown. Just a touch of brown.

While those are roasting, get your herbs together. I've got a couple of bunches of thyme, some rosemary, 3-4 cloves of garlic, and a bay leaf. Use your favorite herbs. I've bundled mine in some cheese cloth so they'll be easy to retrieve from the soup before eating.

Heat up 4 cups of broth and a couple of 15 oz cans of diced tomatoes. Toss in the bundle of herbs. Keep a low simmer and add the veggies after they've browned. You can add leftover chicken or beef at this stage. Add more salt and pepper to taste. Cook for about 10 minutes or until all ingredients are the same temperature.

Crackers are optional. Chins up. Springs on it's way.

Monday, January 3, 2011

Cookies for the New Year

Greetings and happy new year! I hope you all had a wonderful holiday season filled with lots of friends, family, and love. Although the festivities are over, there's always an occasion to bake cookies. This sugar cookie recipe is one that is close to my heart. It's a simple recipe that my family has been using for a couple of decades. We first discovered it in one of my favorite childhood books - a costume/decoration/cookbook for Halloween. We've used this dough not just for Halloween, but for every holiday. (As you might notice, the Christmas cutters below.)

This isn't your typical sugar cookie. I don't really care for regular sugar cookies that are tough and loaded with extra sugar. This cookie is mild in flavor and has a soft, light texture. They puff just slightly in the oven while baking.

I do love those old-timey cookie cutters. I believe this was a great grandmother's cutter.

This dough doesn't spread too much so you can place them about one inch apart on a lightly greased cookie sheet.

Here are the lightly puffed delights. There is an icing battle in my household. Whenever we take the time to ice them, we have to leave half of them bare. Dad and I prefer them sans icing and my brother and mom like them iced. Again, this cookie dough is great for any occasion: weddings, baby showers, birthday parties, cookie exchanges, and every holiday that a cookie could be involved. Enjoy and best of luck in the new year!

Puffed Sugar Cookies
-1 cup butter
-1 cup sugar
-3 eggs
-1 tsp. vanilla
-3 cups all-purpose flour, divided
-1/2 tsp. baking soda
-1/2 tsp. baking powder

In a large bowl, cream together the butter and sugar. Add eggs, vanilla, and 1 cup of flour. Mix until combined. Sift together the rest of the flour, baking soda, and baking powder. Fold into the wet mixture. Let chill in the refrigerator for at least 2 hours. (This part can be done a day in advance.)
Preheat oven to 375 degrees and lightly grease a baking sheet (or use parchment paper).
On a lightly floured surface, roll out the dough to somewhere between 1/4 and 1/8 inch thick. *** Cut out dough with cookie cutters of choice and place on baking sheet. Bake for 6-8 min. or until very lightly browned. Transfer to a cooling rack. Let cool before icing.

***It's easier to roll out the dough in sections. Divide the dough into quarters. Take out only one quarter at a time and roll it out. Put the scraps back into the fridge while you are rolling out the second quarter. Keep the dough as cold as possible. When it gets to room temperature or warmer, it can become a bakers nightmare. If you divide the dough, touch it as little as possible, and chill the rest, you'll be just fine. Happy baking!

Here's a recipe for simple drizzle icing:
Combine 2 cups of powdered sugar, 3 tbsp. milk, 1 tbsp. melted butter, 1 tsp. of vanilla extract, and a few drops of food coloring if desired.

Monday, December 20, 2010

Separating the boys from the (gingerbread) men

Santa is about to make his arduous journey around the world. Why not treat the old man to some gingerbread cookies with a kick? Yep, these are not gingerbread boys; they're full grown gingerbread men made with a healthy dose of spiced rum. Although they are robust and rum-y, kids can eat these, too as the alcohol evaporates during baking.

I prefer metal cookie cutters because they have a sharper edge, cutting all the way through the dough. And the older the cutter, the closer it is to my heart.

To lessen the amount of times you have to roll out the dough, try to get as many cookies from the dough each time you roll.


Boozy Gingerbread Men

-1/2 cup softened butter
-1 cup sugar
-1 cup molasses (If you don't care much for molasses, you can substitute some of it with sorghum, maple syrup, and/or honey. Example - 1/2 cup molasses & 1/2 cup honey.)
-1/2 cup spiced rum
-4 cups flour, plus a little bit more for rolling out the dough
-1 tsp. salt
-1 tsp. baking soda
-1.5 tsp. ground ginger
-1/8 tsp. ground clove (optional)
-1/4 tsp. ground cinnamon (optional)

To make the dough:
Beat butter and sugar together in a large mixing bowl until well combined. Add molasses (and honey/maple syrup/sorghum if desired) and rum. Beat until fully incorporated. Set aside.
In a separate bowl, whisk or sift together flour, salt, baking soda, and spices. Add the dry mixture slowly to the wet mixture until combined. Don't over stir. Flatten dough slightly, wrap in plastic wrap, and refrigerate for at least 2 hours. (This dough can be made two days in advance if it's kept in the fridge.)

Tips for rolling out the dough:
Keep the dough as cold as you can. Divide the dough into six smaller pieces. Use one small piece at a time and keep the other pieces in the fridge. This will make it easier for you to roll out as well.
Roll out the dough to 1/4 inch. Work on a lightly floured surface or between sheets of parchment paper. If the dough is sticky, it's better to roll it out on flour.
Having trouble lifting the cookie from your work surface? Slide a thin spatula under it to transfer from the surface to the cookie tray, then next time you roll out the dough, add a bit more flour.

Bake on a greased or parchment paper lined baking sheet at 350 degrees for about 6 min. Let the cookies cool on the baking sheet.

Decorating: if you like dried fruit, nuts, or seeds, you can dot the cookies with them before they go into the oven.
If you like a drizzle of icing, here's a good recipe:
Combine 1/2 cup of powdered sugar, 3/4 tsp. of vanilla extract, and 1 tsp. of milk. Drizzle over cooled cookies. Let dry.

Store cookies in an airtight container. Enjoy!

Tuesday, December 14, 2010

It's POM time

Hello guys! Sorry no recipe this week, but I had to share some good news. Last week, Karli and I got a very cool email. A fella from POM Wonderful messaged us to see if we would come up with a recipe using their delicious and nutritious pomegranate juice and blog about it. My internal response was something like, "Hells yes!" The POM fella is sending us a case to experiment with. I can't wait to get started! Unfortunately, my experimentation won't begin until after this crazy holiday season. Speaking of, boozy gingerbread cookies are coming next week. See you then!